- November 5, 2021
- James Velco
- 0
Windows 11 is here and you want to upgrade. Not so fast.

The good news is Microsoft has released their next generation OS and it is now available to many Windows 10 users. With enhanced features for security and performance, Windows 11 will help you work more efficiently. The bad news is, upgrading to Windows 11 requires an enormous amount of system requirements and even the most capable machines may need extra attention based on when they were purchased or how they are implemented by your IT team.
System Requirements
As we all know, Microsoft lists the minimum requirements for all Windows OS systems, however those are bare minimum requirements to run Windows (which allow the computer to run like it’s 1997 and you are connecting to AOL Online). To perform optimally, Windows 11 should have the following hardware-
- Recommended CPU:
- 1 gigahertz (GHz) or faster with two or more cores on a compatible 64-bit processor or System on a Chip (SoC) 8th gen Intel or higher
- Intel Processors (8th gen and up recommended with some 7th gen supported) Listed here https://docs.microsoft.com/en-us/windows-hardware/design/minimum/supported/windows-11-supported-intel-processors
- AMD Epyc and Ryzen series processors Listed here https://docs.microsoft.com/en-us/windows-hardware/design/minimum/supported/windows-11-supported-amd-processors
- All processors need to support a form of DCH or (Declarative, Componentized Hardware support) for secure device and driver signing.
- RAM:4GB
- Storage:64GB or more
- System Firmware:UEFI, Secure Boot compatible
- TPM: Trusted Platform Module (TPM) version 2.0
- Graphics card: Compatible with DirectX 12 or later with WDDM 2.0 driver
- Display: High definition (720p) display that is greater than 9” diagonally, 8 bits per color channel
- Internet:Windows 11 Home edition requires internet connectivity and a Microsoft account to complete device setup on first use.
With this knowledge, you or your tech team can check the computers in use to see if they meet these requirements. If the hardware seems to be in order, it’s time to upgrade.
Wait one minute, this is Windows we are talking about, it can’t be that easy? Of course not!
When you start the upgrade process, you may be met with some errors that could stop you in your tracks. These errors could even affect the reinstallation of current versions of Windows 10 (even with installation media!). In fact, some of these issues can prevent the installation or prevent updates to the newest Windows 10 releases of 21h2. We will address two of the most common errors and how you can go about correcting them.
The two most common issues – SECURE BOOT and TPM
What is SECURE BOOT?
SECURE BOOT is a security standard developed by members of the PC industry to help make sure that when a device boots, it only uses software that is trusted by the Original Equipment Manufacturer (OEM). When the signatures are valid, the PC boots, and the firmware gives control to the operating system. Typically, this is used in conjunction with a UEFI installation to verify the system to allow it to continue booting. The trouble begins when disks are improperly configured or are not using UEFI and this feature is disabled.
What is a TPM module or chip?
It stands for Trusted Platform Module and its typically used for security purposes and they have been a common component in dedicated business desktops and notebooks for many years.
SECURE BOOT and Disk Checks
The first step is to see if the system components of your current version of Windows 10 are compatible with an upgrade to Windows 11.
Many users have found they are still on a Windows 10 version, like 1803, which cannot upgrade to a newer Windows 10 environment. This can be due to anything, from SECURE BOOT issues to a poorly configured WSUS causing updates to fail or a rollback every time you try to upgrade.
What can you do? Well, we will focus on a few options that may get you past this roadblock.
- Check disk type
- Right click on the disk and click on Properties; check if its MBR or GPT
- The disk must be GPT; if not, you will not be able to upgrade
- Check UEFI
- The disk must be installed as UEFI; if not, you will not be able to upgrade
You might ask yourself, shouldn’t these things be turned on by default?
While this is the standard method of deployment, some images and installation media may not have been configured to install in UEFI, causing issues to appear on the computer. This can happen when the tech that built the computer did not check the UEFI during installation process. The funny thing is that Windows 10 can still install without UEFI because no error or pop up will appear. This sets you up to get penalized when installing Windows 11.
The next step is to check the BIOS on the computer to see if it is in SECURE BOOT UEFI or if it’s in legacy CSM mode. If the BIOS in Legacy CSM mode, you will need to do some work to get the computer into UEFI and SECURE BOOT ready.
How can you fix this?
In some cases, you may need to clear the security keys and have your computer pull or create new ones when reinstalling.
In other cases, it’s not so simple. If clearing the security keys does not work, you can fix this issue with third party tools or, if you’re running a version of Windows 10 after version 1703, you can use the Windows mbr2gpt.exe utility to do an in-place conversion of the disk to GPT and enable UEFI features.
Remember, it is recommended to backup the data on the drive before doing this just in case you run into an issue.
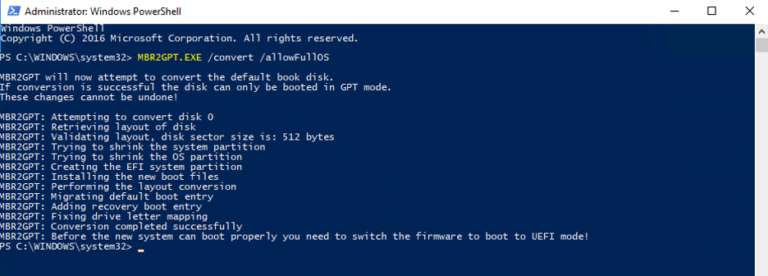
Once the disk is backed up, use the administrative privileges to run the mbr2gpt.exe tool from the command prompt with the following switches: mbr2gpt.exe /convert /allowFullOS

When the process is completed, you should see a final message letting you know “Before the new system can boot properly once you switch the firmware to boot to UEFI mode!”
Restart the machine, go back into the BIOS to make the change to UEFI mode and your conversion to GPT should be complete. This will allow UEFI and SECURE BOOT to be enabled to meet the requirements.
Note: This situation may occur if you need to reinstall Windows to get a computer up to date. This problem may be due to the hardware security setup on the motherboard. This will require you to install Windows in legacy mode and complete the above steps. There have been instances where SECURE BOOT will not let you clear the drive during the Windows installation unless it is disabled and this may result in legacy mode installations.
TPM Check
Now that you have SECURE BOOT enabled and your disk is in the proper format, your next hurdle may be the TPM module. TPM or Trusted Platform Modules can be either built in or on some computers (mostly desktops), installed as a module to enable the feature. Many computers manufactured after 2014 have TPM built in or the ability to support TPM. If your computer is not seeing TPM, you may want to check your BIOS and see if TPM is turned off or disabled. Many times, on computers manufactured after 2014, simply enabling this feature in your motherboard will turn this requirement off. Just enable and you will be ready to install Windows 11.
You can easily look for your TPM before getting into BIOS, by opening the Windows run prompt.
- Press the Windows + R keys
- Enter TPM.MSC
- Click OK or hit enter
In Status you will either see that TPM is ready for use or that a compatible TPM cannot be found.
If the Status says TPM cannot be found, go into the BIOS and check to see if there is a TPM to enable.
Note- If a TPM is not found in the BIOS, it may not be installed and some motherboards will require you to purchase a TPM module. Remember, Windows 11 needs TPM 2.0 or higher, so if you need to install a TPM on your motherboard, make sure it is 2.0. If the installed module is TPM 2.0, just enable it and you are all set.
The system requirements for Windows 11 are not straightforward, so we hope that this guide helps a little bit in understanding the complexities. If you find yourself needing assistance, reach out to us at TechNoir Solutions; we can help with preparing your IT environment for Windows 11.
